


.Welcome to the whimsical world of Wooly Willy, where creativity meets magnetic magic! If you’ve ever been fascinated by those quirky faces created with iron filings and a magnetic wand, then you’re in for a treat. In this blog post, we’ll guide you through the joyful process of making your very own Wooly Willy Magnetic Toy. Let’s dive in and unleash our inner artist!
Materials and Tools Needed
To create your very own Wooly Willy magnetic toy, you’ll need a few key materials and tools to bring this classic toy to life. First up, gather some small metal shavings or iron filings. You can find these at most craft stores or online shops specializing in DIY projects.
Next, grab a clear plastic container with a flat surface – like an old CD case or even a small picture frame without the glass. This will serve as the base for your magnetic creation.
Don’t forget about the star of the show – a magnet! A simple fridge magnet will do the trick, but feel free to get creative with different shapes and sizes for added fun.
Keep some tweezers handy for precise placement of the metal shavings on your Wooly Willy’s face. And if you want to add some color to your creation, consider using colored sand or glitter for extra flair.
Step-by-Step Instructions for Making a Wooly Willy Toy
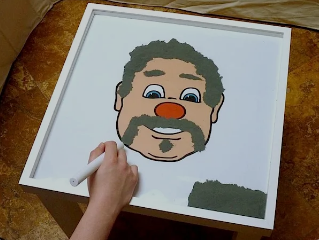
Are you ready to bring the iconic Wooly Willy toy to life with your own creative touch? Let’s dive into the step-by-step instructions for crafting this classic magnetic masterpiece.
First gather your materials a small clear container iron filings a printed picture of a face (or draw one yourself), and a magnet. Make sure to have scissors and glue on hand too.
Next, carefully cut out the face from your picture or drawing. Glue it onto the backside of your clear container so that it shows through from the front
Now comes the fun part – sprinkle a generous amount of iron filings onto the front of your container where you placed the face image. Use your magnet to move and manipulate the filings to create different facial hairstyles and designs.
Experiment with different styles until you achieve that perfect wooly hairdo or mustache! Enjoy watching as your Wooly Willy creation transforms before your eyes with just a few flicks of the magnet.
Tips for Customizing Your Wooly Willy Creation
Looking to add a personal touch to your Wooly Willy creation? Here are some tips to help you customize your magnetic toy:
Experiment with different colored wool fibers or yarns to create unique hairstyles for Willy. Mix and match colors to give him a fun and vibrant look.
Get creative with accessories! Add tiny beads, sequins, or even small buttons to embellish Willy’s outfit. This can bring out his personality and make him stand out.
Don’t limit yourself to traditional features. Consider giving Willy quirky facial hair like a mustache or beard, or even go wild with funky eyebrows.
Try using different magnets of various sizes and shapes for the magnetic wand. This can change the way the iron filings move around, creating new patterns every time you play.
Remember there are no rules when it comes to customizing your Wooly Willy – let your imagination run wild!
Fun Ways to Play with the Magnetic Toy
Looking for some creative ways to play with your Wooly Willy magnetic toy? Here are a few fun suggestions to spark your imagination!
One way to enjoy your Wooly Willy creation is by challenging yourself or others to create specific designs on the face using the magnetic wand. You can set time limits and see who can come up with the most intricate or funny facial hair styles.
Another idea is to use your Wooly Willy as a storytelling prompt. Create different looks on the face then take turns coming up with stories about. who this character is what they do for a living and where they re headed next.
If you’re feeling artistic, try incorporating your Wooly Willy into other art projects. Take photos of the faces you create and use them as inspiration for drawings or paintings.
And don’t forget that playing with magnets can be soothing and relaxing. Spend some quiet time arranging and rearranging the magnetic particles on Wooly Willy’s face to calm your mind after a long day. Enjoy experimenting with different styles and expressions – there’s no limit to how much fun you can have!
Other DIY Magnetic Toys to Try
If you’ve enjoyed making your own Wooly Willy magnetic toy you might be interested in exploring other DIY projects with magnets.
Another creative option is crafting a magnetic poetry set using small pieces of paper or magnets with words on them that can be rearranged to form different phrases and poems on a metal surface. This activity can spark creativity and inspire budding poets.
For those who enjoy puzzles, designing a magnetic maze with marbles or small balls. that need to navigate through twists and turns using the attraction of magnets could provide hours of entertainment.
Experimenting with different textures shapes and sizes .when creating your own DIY magnetic toys will keep the fun going and offer endless possibilities for imaginative play.
The Joy of Creating Your Own Wooly Willy Toy
Let your creativity shine through as you embark on the journey of creating your very own Wooly Willy magnetic toy. By following these simple, steps and adding your personal touch you can bring to life a classic toy that has been entertaining generations for decades. The satisfaction of crafting something .unique with your hands and the joy of playing with your creation make this DIY project truly special. So gather your materials unleash your imagination and enjoy the process of making ,a Wooly Willy toy that is one-of-a-kind. Happy crafting!


