


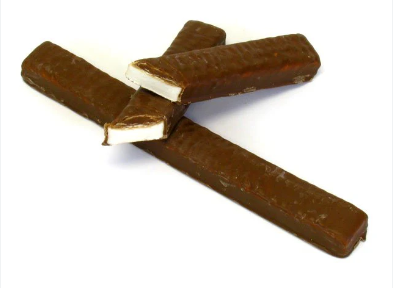
Welcome to the sweet world of Charleston Chew Bars! If you’re a fan of this classic candy but want to try your hand at making it from scratch, you’ve come to the right place. Get ready to indulge in a homemade treat that will have your taste buds dancing with delight. Follow along as we guide you through the process of creating these chewy, chocolatey delights right in your own kitchen. Let’s dive into the deliciousness and bring a taste of nostalgia into your home!
Ingredients and Materials Needed
To whip up some delicious homemade Charleston Chew Bars, you’ll need a handful of simple ingredients and tools that are likely already in your kitchen. To start off, grab some semi-sweet chocolate chips for that decadent coating. You’ll also want to have sweetened condensed milk on hand to create that chewy nougat filling.
Next up, make sure you have vanilla extract for a hint of flavor and corn syrup to help achieve the perfect texture. Don’t forget the confectioner’s sugar to sweeten things up! For the base layer, graham crackers will add a crunchy element while still keeping it classic.
In terms of materials, a mixing bowl and spatula are key for combining all those tasty components together. A baking dish lined with parchment paper will make it easy to lift out your bars once they’re set. And lastly, having a sharp knife for slicing through those luscious layers is essential for creating picture-perfect treats.
Step-by-Step Instructions on How to Make Charleston Chew Bars
Are you ready to embark on a delicious homemade treat adventure? Let’s dive into the step-by-step process of making your very own Charleston Chew Bars.
First, gather all your ingredients and materials. You’ll need sugar, corn syrup, water, vanilla extract, chocolate chips, and butter – among other things. Preparing everything in advance will make the cooking process smoother.
Start by combining sugar, corn syrup, and water in a saucepan over medium heat. Stir continuously until the mixture reaches 260°F on a candy thermometer. Be patient; this step is crucial for that perfect chewy texture!
Once the mixture hits the right temperature, remove it from heat and stir in vanilla extract. Pour the hot caramel onto a baking sheet lined with parchment paper and let it cool completely.
Next comes coating your bars with melted chocolate – an indulgent touch that takes these treats to another level! Drizzle or dip each bar before allowing them to set.
Now comes the hardest part – waiting for your Charleston Chew Bars to set completely before cutting them into bite-sized pieces. It may be tough resisting temptation but trust us; it’s worth every minute!
Variations and Additions to the Recipe
Get creative with your Charleston Chew Bars by trying out different variations and additions to the classic recipe. Adding a sprinkle of sea salt on top before the chocolate sets can give your bars a tantalizing sweet and salty flavor combination.
For a fruity twist, consider mixing in some dried cranberries or chopped cherries into the nougat mixture before setting it in the pan. The burst of tartness will complement the sweetness of the marshmallowy center.
If you’re feeling adventurous, try incorporating chopped nuts like almonds or pecans for an added crunch and nutty flavor profile. You can even drizzle caramel sauce over the top layer of chocolate for a decadent touch.
Experimenting with flavors and textures is all part of the fun when it comes to making homemade treats like Charleston Chew Bars. Let your imagination run wild and enjoy customizing this beloved candy bar to suit your taste preferences!
Tips for Perfecting Your Homemade Charleston Chew Bars
To ensure your homemade Charleston Chew bars turn out just right, there are a few tips to keep in mind. First off, when melting the marshmallows and butter together, make sure to do it slowly over low heat. This will prevent scorching and ensure a smooth consistency.
Another tip is to line your baking pan with parchment paper before pressing the mixture in. This will make it easier to remove the bars once they’ve set. Additionally, don’t forget to generously grease both the pan and your hands when working with the sticky marshmallow mixture.
For that signature chocolate coating on top, melt the chocolate chips with a bit of vegetable oil for a glossy finish. And if you’re feeling adventurous, try adding some chopped nuts or shredded coconut on top for extra texture and flavor.
Be patient when chilling the bars in the fridge; this step allows them to set properly before slicing into decadent squares of chewy goodness!
Serving and Storing Suggestions
When it comes to serving your homemade Charleston Chew Bars, consider cutting them into bite-sized pieces for easy snacking. Present them on a decorative platter or wrap them individually for a grab-and-go treat.
If you’re hosting a gathering, pair these delicious bars with a scoop of vanilla ice cream or a dollop of whipped cream for an extra indulgent dessert experience. The chewy texture and rich chocolate flavor will surely impress your guests.
For storing suggestions, keep your Charleston Chew Bars in an airtight container at room temperature. They can also be refrigerated for longer shelf life, but allow them to come to room temperature before serving to maintain their softness and flavor.
Whether enjoyed fresh out of the oven or saved for later, these homemade treats are bound to be a hit with friends and family alike!
Summary
To wrap up, making homemade Charleston Chew Bars is a fun and delicious way to enjoy this nostalgic treat right in your own kitchen. By following the simple steps outlined above and getting creative with variations, you can customize these bars to suit your taste preferences. Remember to store them properly for freshness and enjoy sharing them with friends and family. Get ready to indulge in the chewy goodness of these homemade treats that will surely satisfy any sweet tooth craving!


