


Welcome to the tropical paradise of coconut oil extraction! If you’re a fan of all things natural and DIY, then this tutorial is just for you. From the lush palm trees to your kitchen counter, join us on a journey to discover how to extract pure coconut oil from scratch. Get ready to unlock the secrets of this versatile and beneficial oil right at home!
Benefits of Making Your Own Coconut Oil
Making your own coconut oil comes with a multitude of benefits that go beyond just the satisfaction of creating something from scratch. By extracting coconut oil at home, you have full control over the quality and purity of the final product. Say goodbye to added chemicals or preservatives commonly found in store-bought options.
Not only is homemade coconut oil free from any unwanted additives, but it also retains more nutrients and beneficial properties compared to commercially processed varieties. The process allows you to experience the pure essence of coconuts while enjoying all its natural goodness.
In addition to being healthier for your body, making your own coconut oil can also be more environmentally friendly as it reduces packaging waste and carbon emissions associated with transportation. Embrace sustainability by utilizing every part of the coconut in this DIY project.
Moreover, crafting your own coconut oil fosters a deeper connection with nature and traditional methods of production. It’s a rewarding experience that not only yields an essential ingredient but also cultivates a sense of self-sufficiency and appreciation for natural resources.
Necessary Tools and Ingredients
To embark on your coconut oil extraction journey, you’ll need just a few simple tools and ingredients that are easily accessible. First up, gather fresh coconuts – the star of the show! Look for ones that feel heavy for their size and have no mold or cracks. A good knife will come in handy to crack open the coconuts with precision.
Once you’ve revealed the white flesh inside, a sturdy grater or blender will help you shred it into smaller pieces efficiently. A fine mesh strainer or cheesecloth is essential for squeezing out every drop of that liquid gold – your homemade coconut oil!
Additionally, having a large bowl to catch the extracted oil and storage containers ready to house your finished product is key. Don’t forget patience and a willingness to get hands-on throughout this process; it’s all part of the fun in creating your own pure coconut oil from scratch!
Step-by-Step Process: Extracting Coconut Oil from Scratch
Are you ready to dive into the exciting process of extracting coconut oil from scratch? Let’s get started!
First, gather your fresh coconuts and crack them open. Separate the white flesh from the shell and cut it into smaller pieces.
Next, blend the coconut pieces with water until you create a smooth mixture. Squeeze out the milk from this mixture using a cheesecloth or strainer.
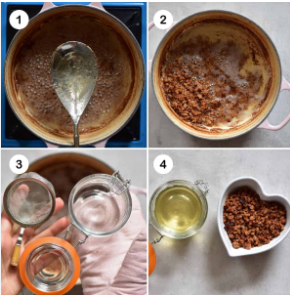
Allow the coconut milk to sit for a few hours until it separates into layers – cream on top and liquid at the bottom.
Scoop out the creamy layer carefully and transfer it to a pan. Heat it over low heat while stirring occasionally until all moisture evaporates, leaving behind pure coconut oil.
Once cooled, strain your homemade oil through a fine sieve or cheesecloth to remove any impurities.
Voila! You now have freshly extracted oil ready for use in cooking, skincare, hair care, and more. Enjoy this natural beauty elixir straight from your kitchen!
Tips and Tricks for a Successful Extraction
When it comes to extracting oil from scratch, there are a few tips and tricks that can help ensure a successful process.
Make sure you use fresh coconuts for the best results. The freshness of the coconut will directly impact the quality and taste of your homemade coconut oil.
Be patient during the extraction process. Slow and steady wins the race when it comes to getting every last drop of oil out of the coconut pulp.
Additionally, maintaining a consistent temperature throughout the extraction is crucial. Too high or too low temperatures can affect the quality of the final product.
Furthermore, investing in a good quality blender or food processor can make a significant difference in how efficiently you extract the oil from the coconut flesh.
Don’t forget to store your homemade oil in an airtight container in a cool, dark place to preserve its freshness and aroma.
Utilizing Leftover Coconut Pulp and Other Uses for Coconut Oil
Now that you’ve successfully extracted your oil, don’t let the leftover coconut pulp go to waste! Get creative with how you can utilize it in various ways. One option is to dry out the pulp and use it as a natural exfoliant for your skin. Simply mix it with some honey or yogurt for a DIY scrub.
Another great way to repurpose the coconut pulp is by incorporating it into baked goods like cookies or muffins for added texture and flavor. You can also blend the pulp into smoothies or oatmeal bowls for a nutritious boost.
As for the coconut oil itself, the possibilities are endless. Use it as a moisturizer for your hair and skin, makeup remover, cooking ingredient, or even as a natural treatment for cuts and scrapes due to its antibacterial properties.
Embrace the versatility of coconut oil and get creative in finding new ways to incorporate this tropical treasure into your daily routine!
Enjoy the Fruits (and Oils) of Your Labor!
By following this tutorial, you have learned how to extract coconut oil from scratch. A process that not only yields high-quality oil but also allows you to enjoy the many benefits it offers. Making your own coconut oil provides you with a natural and pure product free from additives or preservatives.
So, grab your coconuts, necessary tools, and ingredients, and embark on this DIY journey. The satisfaction of creating your own oil from start to finish is truly rewarding. Embrace the versatility of oil in various culinary dishes, skincare routines, hair treatments, and more.
Now that you know how to extract oil at home successfully, go ahead and revel in the fruits (and oils) of your labor!


